You have already heard about normal keys, RealKeys (I hope), release timers, long timers, RL timers etc etc... yes that's beginning to be a lot of concepts to learn. The Autolock uses all these concepts and more, so this is complex stuff. Very few people grasp all its subtleties, so don't be ashamed if you master only 25% of its capabilities. Bear with me, this tutorial is going to be very long.
Please note that this is the second version of the Autolock plugin, this one is a complete rewrite and has been introduced in v1.24 of the RR products. You can find the tutorial for the old version here.
There are multiple purposes to this plugin : you could want to program your bottom's restraints to automatically lock themselves after a while while she's wandering around, or you could want to make her already tight bondage vary a little over time, or you could want to make her struggles even more difficult by regularly re-locking her restraints even when you are not around... It's quite versatile.
Before we start explaining what this plugin is all about, let's take a look at its menus first. I click on my Vixen cuffs and I go to "Plugins..." > "Autolock..." :
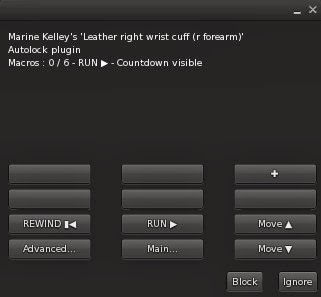
What you see is the (currently empty) list of "macros" to be run by the Autolock. But as written on the top of the menu, "Macros : 0 / 6" so... not much is going to happen here until I do something about it.
But what is a macro ? Does it have something to do with Word or Excel macros ? As a matter of fact, it does, loosely. A macro is simply a programmed lock with a delay (when to lock), a level (which lock to choose), a timer (how long will it stay locked that way) and other options (will the keys be left or taken, will it start counting now or when the restraint is unlocked, stuff like that).
Ok this is all too theoretical so how about an example ? Let's do this. I click on the big "+" button on the upper right corner, and I get this menu :
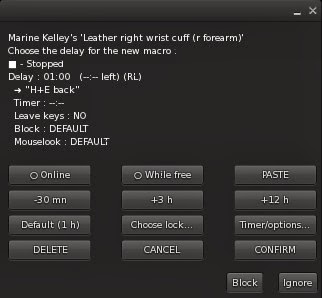
Whoa. What is all this ? There sure is a lot of information in there. Where to begin ?
In fact we are not going to review it now, let's just press "CONFIRM" and see what happens.
Ok this is interesting : the menu shows me there is a macro in the list, that it is running, there is some kind of countdown that shows "01:00 (RL)" and that it will lock to "H+E back", which is the lock that was used last on these cuffs. Oh, and the chat says :
[01:26] Leather right wrist cuff (r forearm): : Device autolocking in 1 hour.
Ok, fine, one hour it is. I'll wait...
*Files her nails*
*Watches TV*
[02:56] Leather right wrist cuff (r forearm): : Device autolocking in 30 minutes.
*Pays no attention to the chat*
*Goes shopping*
*Falls in love with shoes*
[02:16] Leather right wrist cuff (r forearm): : Device autolocking in 10 minutes.
*Still pays no attention to the chat*
*Goes shopping some more*
[02:21] Leather right wrist cuff (r forearm): : Device autolocking in 5 minutes.
[02:24] Leather right wrist cuff (r forearm): : Device autolocking in 2 minutes.
[02:25] Leather right wrist cuff (r forearm): : Device autolocking in 1 minute. Last warning, get ready...
Suddenly I am stopped dead in my tracks by a familiar noise and my arms are rudely cuffed behind my back in front of everyone.
[02:26] Leather right wrist cuff (r forearm): Marine's Leather right wrist cuff (r forearm) automatic lock triggered
[02:26] Leather right wrist cuff (r forearm): Marine has been locked by Marine ("H+E back").
[02:26] Leather right wrist cuff (r forearm): Marine's Leather right wrist cuff (r forearm) automatic lock triggered
Executing macro 1/1
Type : H+E back
Timer : --:--
Keys taken
Block : DEFAULT
Mouselook : DEFAULT
Who the hell... Oh I understand, I was so busy I completely forgot about that autolock and now I'm stuck ! Ok, ok, it's not that bad, I still have my own keys and no timer is set, so I can unlock myself, which I do now.
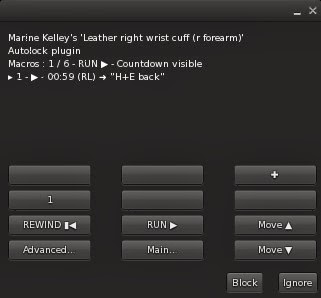
Then I take a look at the Autolock menu again, and... oh this is interesting :

The menu shows me the macro, but it is now "stopped" (I can tell from the big square icon on its line). Does this mean it won't trigger anymore ?
Ok, so let's review what happened here during this quick example.
The macro that was created had default settings since I hit "CONFIRM" without changing anything. These default settings were :
- Set to the last lock used (in this case "H+E back")
- No timer
- Give the keys to whoever has created that macro (that's me, in this case)
- Lock after one hour real time (meaning, no need to stay online the whole time)
- Block & Mouselook settings are unchanged
- The macro starts as soon as possible and does not wait for the restraints to be unlocked first
Easy enough. As complex as this plugin is, I have made it so the menu is always pretty self-explanatory so you don't get confused about some cryptic settings. It is important to know what you're doing, because you can make your program really sophisticated.
Macros ? Program ? Is there some hint of geekery here ? Probably so. This is exactly what it looks like, the Autolock is a way to program the restraint so it executes your instructions in the future. Instructions in this case are macros, and you can define up to 6 of them. Each macro will need the previous one to be executed before starting.
This is the most important bit about this plugin, so I will write it again in bold :
Macros are executed in sequence, not all at the same time.
So in order to have Macro nbr 2 start, you must wait until Macro nbr 1 has executed, i.e. its countdown has reached zero. There is a little subtlety here : you can set your macro to require the restraint to be unlocked on top of it (it doesn't by default).
In other words, you can set a macro so it starts either at the moment the previous macro is executed, or after it has been executed AND the restraint has been unlocked (which can be a while later).
A little drawing is worth a thousand words, so let me show you a good way to see it. Firstly, this is a macro :

As you can see, a macro has a part before it is executed, and a part after it is executed. The countdown runs until it reaches zero, then the macro is executed, and the wearer is locked afterwards. After a macro is executed, it is set to "Stopped" and the next one may begin counting down.
Actually whether the next macro begins counting down or not depends on its "While free" option. If that option is turned off, then it starts counting down immediately after the previous macro is executed (and the wearer is locked up). If it is turned off, it will wait until the restraint is unlocked before counting down, as indicated on this drawing :

With me so far ? This drawing is pretty easy to understand, you see the difference immediately. The starting point of the second macro depends on its own "While free" bit. Please note that the option is called "While free" and not "When free". This means that even if the macro has already started counting down, if the restraint is suddenly locked for other reasons, the countdown will be suspended until the restraint is unlocked, and only then will it be resumed.
So if you create several macros, some with "While free" set to "on" and others set to "off", you may end up with such a program :

On this drawing, Macros 2 and 4 are set to "While free OFF", while Macro 3 is set to "While free ON". For this example, we don't care about the "While free" setting of Macro 1, but we would if the wearer was locked during that time. You can see that if a macro is executed while the wearer is locked, the current lock is replaced by the new one.
Finally, each macro has an "Online" setting as well, which determines whether the countdown runs all the time or only while the user is online.

If the "Online" bit is set to "OFF", then the restraint will be locked as soon as the user logs on, provided the countdown has already reached zero. Autolock does not deduce the time spent offline from the timer to set, though.
Now that you know the theory behind the execution of macros, let's see what the rest of the buttons do.
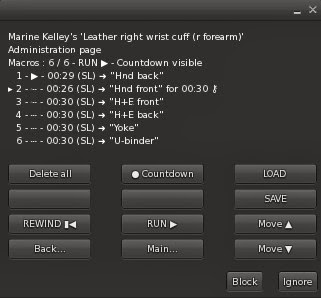
Let's suppose I have created 6 macros, each one with a different lock but all of them with a 30 minute countdown. What does that give us ?
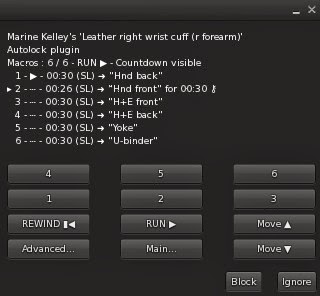
Wow, now we have a lot more information than we can handle, here. But you need to understand what you see so here is what it all means...
The text above the buttons is the list of macros with their status : "Running", "Paused", "Stopped", "Waiting for previous" and "Waiting for unlock".
- Running : The macro is currently running, only one macro may be running at any time.
- Paused : The currently running macro is paused because someone has pushed the "Run" button until it turned to "Pause", pausing the whole plugin.
- Stopped : The macro has already been executed (its countdown reached zero) and will not count down again until it is rewinded.
- Waiting for previous : The macro has a positive countdown but is not the one Running yet, it is waiting for its previous macro to be executed.
- Waiting for unlock : The macro is currently running but its "While free" bit is set to "ON" and the restraint is locked, so it has to be unlocked before the macro is resumed.
Before dwelling into each macro individually, let's see what each button does :
- + : This button lets you create a new macro, but only if there are no more than 5 already created.
- 1 to 6 : Pressing this button brings you to the pages of the corresponding macro, with its individual settings to be set.
- Rewind : Resets all the countdowns, effectively going back to the start. Exactly like rewinding a tape.
- Run/Loop/Pause : This button lets you run and pause the plugin, but also set it to "Loop", meaning that when the last macro is executed, it automatically rewinds the whole program back to the start.
- Move up and Move down : Moves the currently selected macro up or down in the list. The selected macro is the one you clicked on last, or the one you've just created, it is the macro which line starts with an arrow.
- Main... : Goes back to the main page of the restraint, like any plugin in the RR line.
- Advanced... : Leads to a page with more buttons to control the macros as a whole.
On this "advanced" page (which is really nothing more than "page 2" of the same controls, I was just lacking room on the menu, that's all), you find the same 6 lower buttons (except "Advanced..." which becomes "Back..." to return to the first page) and the following upper buttons :
- Delete all : Deletes all the macros. Careful, there is no confirmation and no undo.
- Countdown yes/no : When activated, the countdown says on the chat (heard only by the wearer) how much time is left. It does that 1 hour, then 30 minutes, 10 minutes, 5 minutes, 2 minutes and finally 1 minute before the next execution. When it is deactivated, the wearer would not get any info and will likely be taken completely by surprise.
- LOAD and SAVE : Allows the user to load and save a full program by copy and pasting messages on the chat. It is easy, one only has to follow the instructions given by the plugin at the moment they press those buttons.
Now that we've got all the main buttons covered, let's see how to set up an individual macro. Who said "it's about time" ? I understand that the introduction was long, but it was necessary to grasp the underlying design, and ultimately to know what you're doing when setting up an autolock.
I go back to the first page of the plugin and click on, say, "1" to edit the first macro.
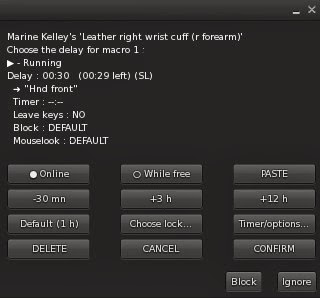
What you see on the text above the buttons is the full textual representation of the macro you are currently editing (whether it is new or already exists). For example, this one says :
> - Running : This macro is currently running, and will be executed when its countdown reaches zero.
Delay : 00:30 (00:28 left) (SL) : This is the countdown, both initial and current. The "(SL)" part means "online".
-> "Hnd front" : This is the lock the restraint will be set to once the macro executes.
Timer : --:-- : This is the timer the restraint will set once locked by this macro.
Leave keys : NO : The keys will be kept by whoever created that macro.
Block : DEFAULT : The "Block" setting (preventing from touching objects) will not change once locked.
Mouselook : DEFAULT : The "Mouselook" setting (being forced to first view) will not change once locked.
There are actually 3 pages of control to create and edit a macro. This is the first page, which allows you to change the delay (the countdown), to decide whether to count real time or online time only, to set the "While free" bit and to paste the last macro that had been created or edited (this is useful when creating a bunch of macros in a row, all with similar settings).
If you press the "-30 mn" button while it is already set to 30 minutes of delay, it goes down to 10 minutes only, which is the minimum.
The three buttons at the bottom allow you to decide what to do to the macro itself (and then brings you back to the main page) :
- DELETE : This will delete the macro.
- CANCEL : This will cancel all changes that you have done to the macro.
- CONFIRM : This will save the macro (and copy it for the next time you press "PASTE" on another macro), creating it if it didn't exist before.
When you press "Choose lock..." you are brought to the second page, the page that lets you choose the lock to be applied. It is pretty straightforward here :
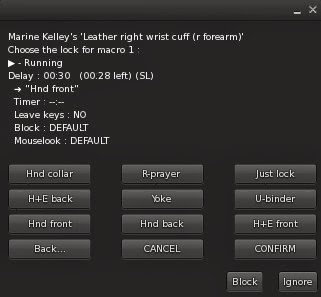
Each button is a lock as defined by the restraint, and the "Just lock" button will do exactly what it says : it will lock without a pose. Press "Back..." to return to the first page.
When you press "Timer/options..." you are brought to the third page, where you can set a timer and some options :
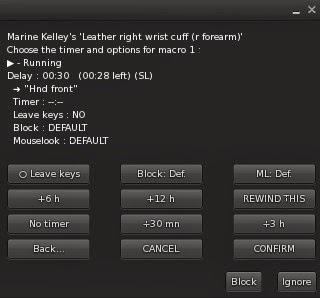
On this page you can choose to make the macro leave the keys on the restraint (don't forget to set a timer, then, or the wearer will be able to free herself), or keep them. You can decide whether the victim is to be Blocked (i.e. prevented from touching anything) and/or "Mouselooked" (i.e. forced to stay in first view). Block and Mouselook have an effect only with arms restraints, just so you know.
You can also rewind the macro, which means setting its current countdown to its initial one, and of course you can decide the timer to set once locked.
There are a handful of subtleties to keep in mind, when using the Autolock. Nothing bad, but things that could surprise you if nobody explains them to you :
- By default, the lock will be the one that was chosen last at the time of the creation of the macro (not of its confirmation).
- When you want the macro to keep the keys, they go to the creator of the macro only if they were on the restraint at the time of its execution. Otherwise they stay in the possession of whoever had them at the time, to avoid surprising them by snatching the keys from their hands.
- Changing the delay and confirming rewinds the macro.
- If you choose to run the Autolock in a loop, keep in mind that this will drive the sub crazy, and possibly get her stuck into an endless loop of bondage because the restraint will keep relocking itself without giving her a chance to struggle out. This may be what you want though !
- You can't set an exact RL schedule with the Autolock, since it waits until the sub logs on before firing its locks. This is due to the fact that the timer to set does not decrease even if the sub was offline at the time when the restraint was supposed to be locked.
- If your restraint does not have keys, like ropes, blindfolds and tape, some terms will change from "lock" to "tie", but the way to use it is strictly the same.
- Last but not least, there seems to be a known issue when using the Autolock for the first time with "online" off. Apparently it will lock right away. It will do that only once though. I will work on that later and see if I can come up with a solution.
Whew ! That's pretty much it. I'm sorry if this tutorial was long-winded, but this is a complex plugin and many things needed to be explained.
I hope you'll have fun with the Autolock !
Marine

